Monday, January 30, 2012

Meow! Cat Quilt

One of my absolute favorite quilt books is The Cat's Meow by Janet Kime.  I was lucky enough to see these quilts years ago when I visited the quilt shop, In the Beginning, in Seattle (it's now closed).  If you are a cat lover, you want this book.  The patterns are absolutely adorable and you fall in love with every quilt that you make from this book. 

I LOVE this quilt that I just made based on the Plaid Cats pattern.  I used fabrics that I dyed, and each cat block is 2.5" x 4".  The quilt is much brighter, but I've yet to master taking pictures on my camera. :)


 A close-up of the cat blocks:


The quilt is going to be hanged outside the cat bathroom in my basement.  When we renovated the basement, we put in a cat bathroom next to the regular bathroom.  It's where we place the litter box, and it is fully-tiled with a floor drain and faucet that we can use when we can scrub down the room.  I have 5 cats and this room has been absolutely worth the expense.  I'll post pictures of it when I finish quilting this quilt.

Sunday, January 29, 2012

Wonky House Block Swap Completed!

It's finally done - all 11 Wonky House blocks with the siggy blocks!  I'm so happy that they're finished and ready to be sent out tomorrow.  It was a great swap, and the people in it were fabulous.  Their blocks inspired me to try new techniques and embrace freeform piecing, which is way out of the comfort zone for anal me.

Here they are:

With the exception of Wonky House #1, all the blocks were done free-form, including the siggy Wonky House blocks.  I actually made 15 Wonky House blocks, but kept 4 so I can make a wallhanging with them (will post the pictures soon).

I enjoyed this swap so much that I'm going to join the Wonky Stars and Wonky Trees swap, which is  coming up soon.

I hope you enjoy these houses as much as I did making them!

Tuesday, January 24, 2012

Love the Wonky Houses!

I'm a part of the Wonky House block swap and have been working on the 12 blocks to be sent out by March.  This is my most recent one and it's my favorite!


A close-up of the tree and girls:


I was inspired by the tutorial that I found on the comfortstitching blog by Aneela Hoey.  It was a tutorial on raw-edge applique to make the girl on a tree swing mini quilt.  It is such a beautiful quilt and I loved the technique.  I wanted to use it in this Wonky House block.

I started by cutting a piece of light fusible webbing  to the size of the house and ironing on pieces of aqua scraps that I had.


After I covered the fusible webbing with fabric, I pressed the whole piece onto white fabric and began the raw edge applique.  I used white rayon thread to sew around each piece of fabric.  When I was done, I trimmed the block:


Once this was done, the rest of the block just evolved.  I enjoyed the raw applique so I added the tree, girls and clouds, and sewed around each with the rayon thread. 

I'm really loving this particular swap because each block is different, and made with a different technique.  Many of them have been done freeform, which is way out of my comfort zone, but I really like the end result.  I've learned a lot of new techniques with this swap, and I'll be sad when it's done.  It's been a lot of fun!

Wednesday, January 18, 2012

I spent this past weekend dyeing fabric and the third time's the charm!  I've been trying to figure out the proportions of the dye solutions so that I could create this color wheel.  It only took doubling everything to get these results.  Now, what to do with them ...


While I was trying to figure that out, I worked on the January swap block for the The 99 quilting bee, which is based on the book, Modern Blocks.  This block is called "It's a Stretch".


Great pattern, and relatively easy to do.  The trickiest part was making the sewing lines on the paper piecing pattern visible on both sides for accurate placement of the fabrics.  My sister is whiz at figuring out these things and printed the pattern on translucent paper on an inkjet printer, which worked really well.  Thanks sis! 


Friday, January 6, 2012

Sawtooth Star Variation using HSTs Tutorial

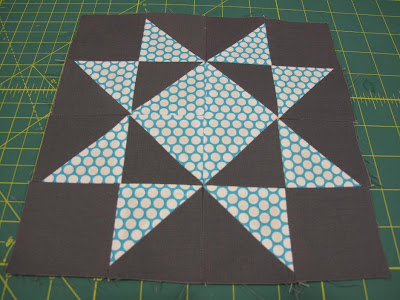
As part of the Oh My Stars! quilt along, I made additional blocks of different star patterns.  One block that I particularly liked is a variation of the Sawtooth Star block.  To make this variation, I used a paper template that I found on the Quilting and Whatnot blog, where you can find PDFs of HST paper patterns.  I used the pattern for the 2" finished HST square for this block. 

On the pattern sheet in the upper right hand corner is an inch box that you use to test the accuracy of the pattern.  If that box does not measure an inch, then you won't get 2" finished HST squares.  At first, when I printed the sheet, I measured the inch box and kept getting 1/8" shorter than 1".  After a few frustrated tries in which I couldn't get a 1" accurate printing, I finally figured out to look at the printer settings.  My printer was automatically adjusting the size of the image to fit the preset settings.  When I removed that setting, I was able to print the pattern accurately. 

On this sheet, you'll see both dashed and solid lines.  You sew on the dashed lines and cut on the solid lines.  I've drawn the direction of the sewing line so that you can sew all the lines continuously without having to cut your thread.


To begin this process, cut two pieces of fabric that is the size of the paper.


Place the fabrics right sides together, and then place the paper pattern on top.  Pin the layers together, and then begin sewing on the dashed lines.


After all the lines are sewn, cut the paper pattern on all the vertical and horizontal solid lines until you end up with 9 rectangles.


Cut each rectangle in half on the diagonal solid line.


Remove the paper from the fabric.


Press the triangles apart and trim off the ears.


Now you're ready to put the block together!

Cut 4 - 2.5" squares for the corners of the block in the background fabric:


With the HSTs, arrange the squares until you like the design of the block.  You can arrange the squares like this:


Or like this:


Once you decide on the pattern, pin two squares together at a time and chain stitch them.


Continue sewing the squares together until each quarter of the block is completed.  Sew 2 quarters together and then two halves together and you get ...


the completed block!


Using the HST paper pattern is easy, gives you flexibility to play with the design of this block, and adds variety to your Oh My Stars! quilt.

Enjoy!

Tuesday, January 3, 2012

Oh My Stars! Quilt Along

I had this past week off and it was very productive quilt-wise.  One of the projects I worked on was a quilt along that I found accidently while blog hopping.  It's from the thought & found blog, and the tutorials for the blocks are very well done.  I especially love the tutorial on how to make quick Flying Geese blocks for the Sawtooth Star block.


I'm loving the Sawtooth Star blocks that I'm making.  Although I really like the layout of the quilt along, my quilt will be different because I'm incorporating different star blocks and will be using only 8" and 4" blocks.   I think that the 12" blocks are too big. 

Instead of my usual black and white fabrics for the background, I'm using a Kona solid in dark gray, which contrasts very nicely with the vintagey fabrics that I'm using.  They're pretty, aren't they?